
Hiro 2.0 Onboarding Guide
This guide walks you through everything you need to get your agency and clients set up for accurate data, smooth collaboration, and a fully branded experience.
Already on Hiro 1.0? Your clients, templates, and dashboards have been migrated automatically to Hiro 2.0 Beta.
How to use this guide
Follow the steps in order — each phase builds on the one before it:
Agency Account Setup → configure everything at the agency level first
Client Settings Setup → configure each client's data, integrations, and branding
Reporting & Automations → set up your report generator, client dashboards, and Slack notifications
Explore Hiro Dashboards → surface insights across campaigns, flows, retention, and segments
Agency Account Setup
Complete these steps under Account Settings before moving on to individual client setup. This is the foundation — team access, billing, branding, and AI integrations all live here.
1.1 Connect Your Clients
Import clients from the Manage Accounts page to automatically backfill historical order and revenue data. In 2.0, you can connect Klaviyo clients via OAuth or a read only private key — OAuth is the recommended path for the fastest, most reliable setup.
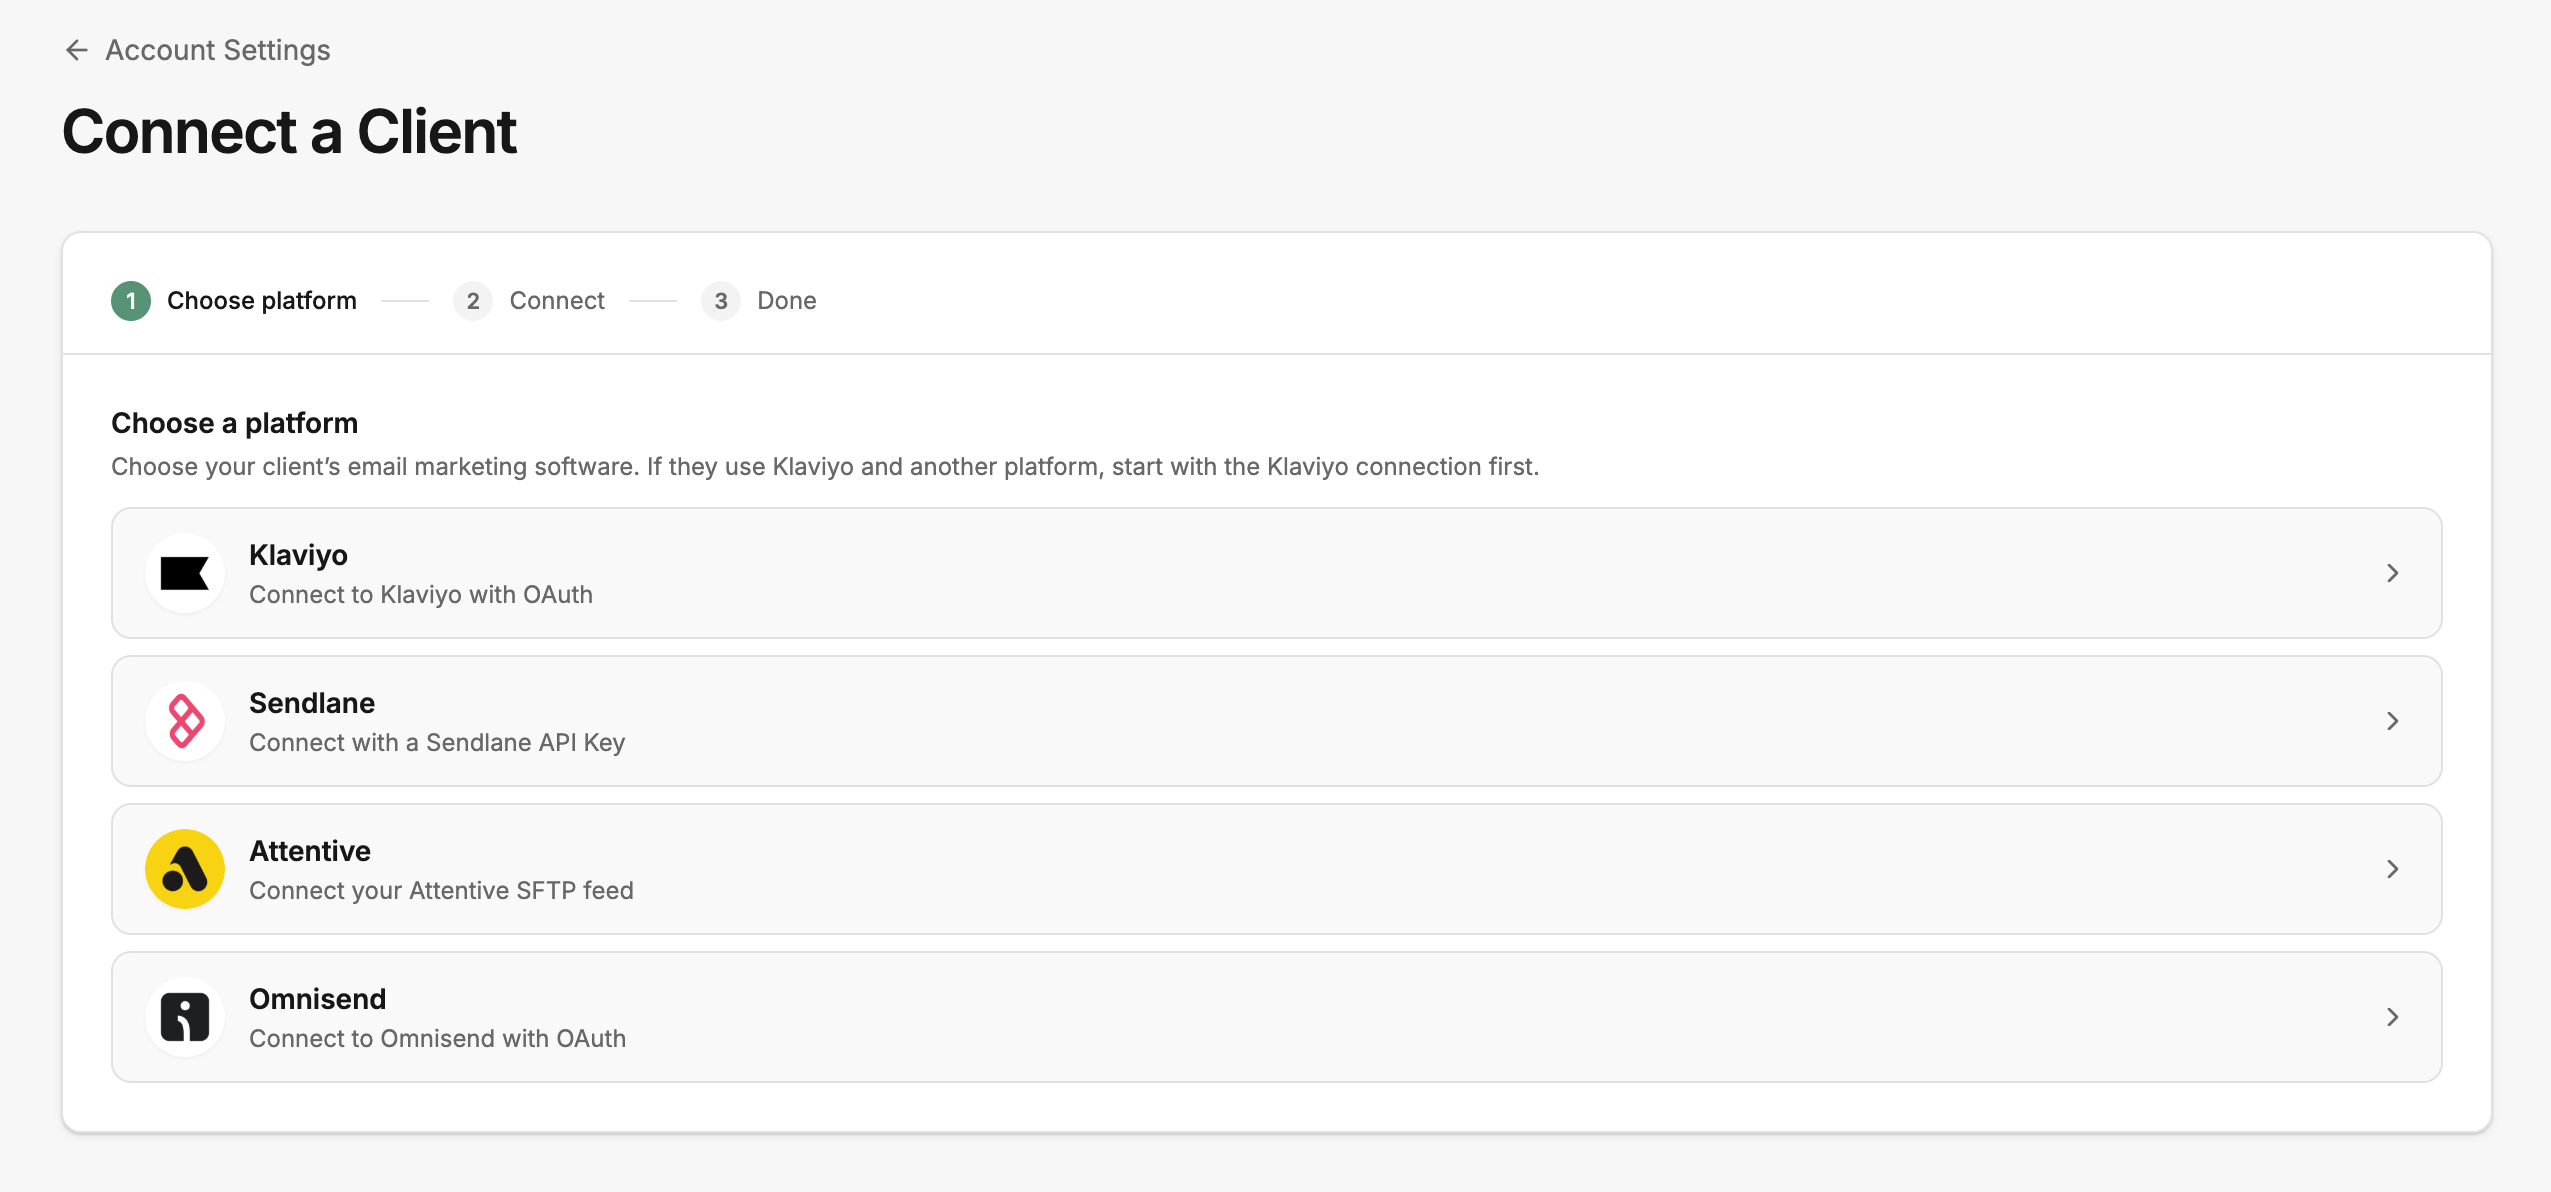
For 1.0 agencies: Your existing clients are already migrated. Any new clients you add should be connected from the 2.0 app so they're set up on the new data path from day one.
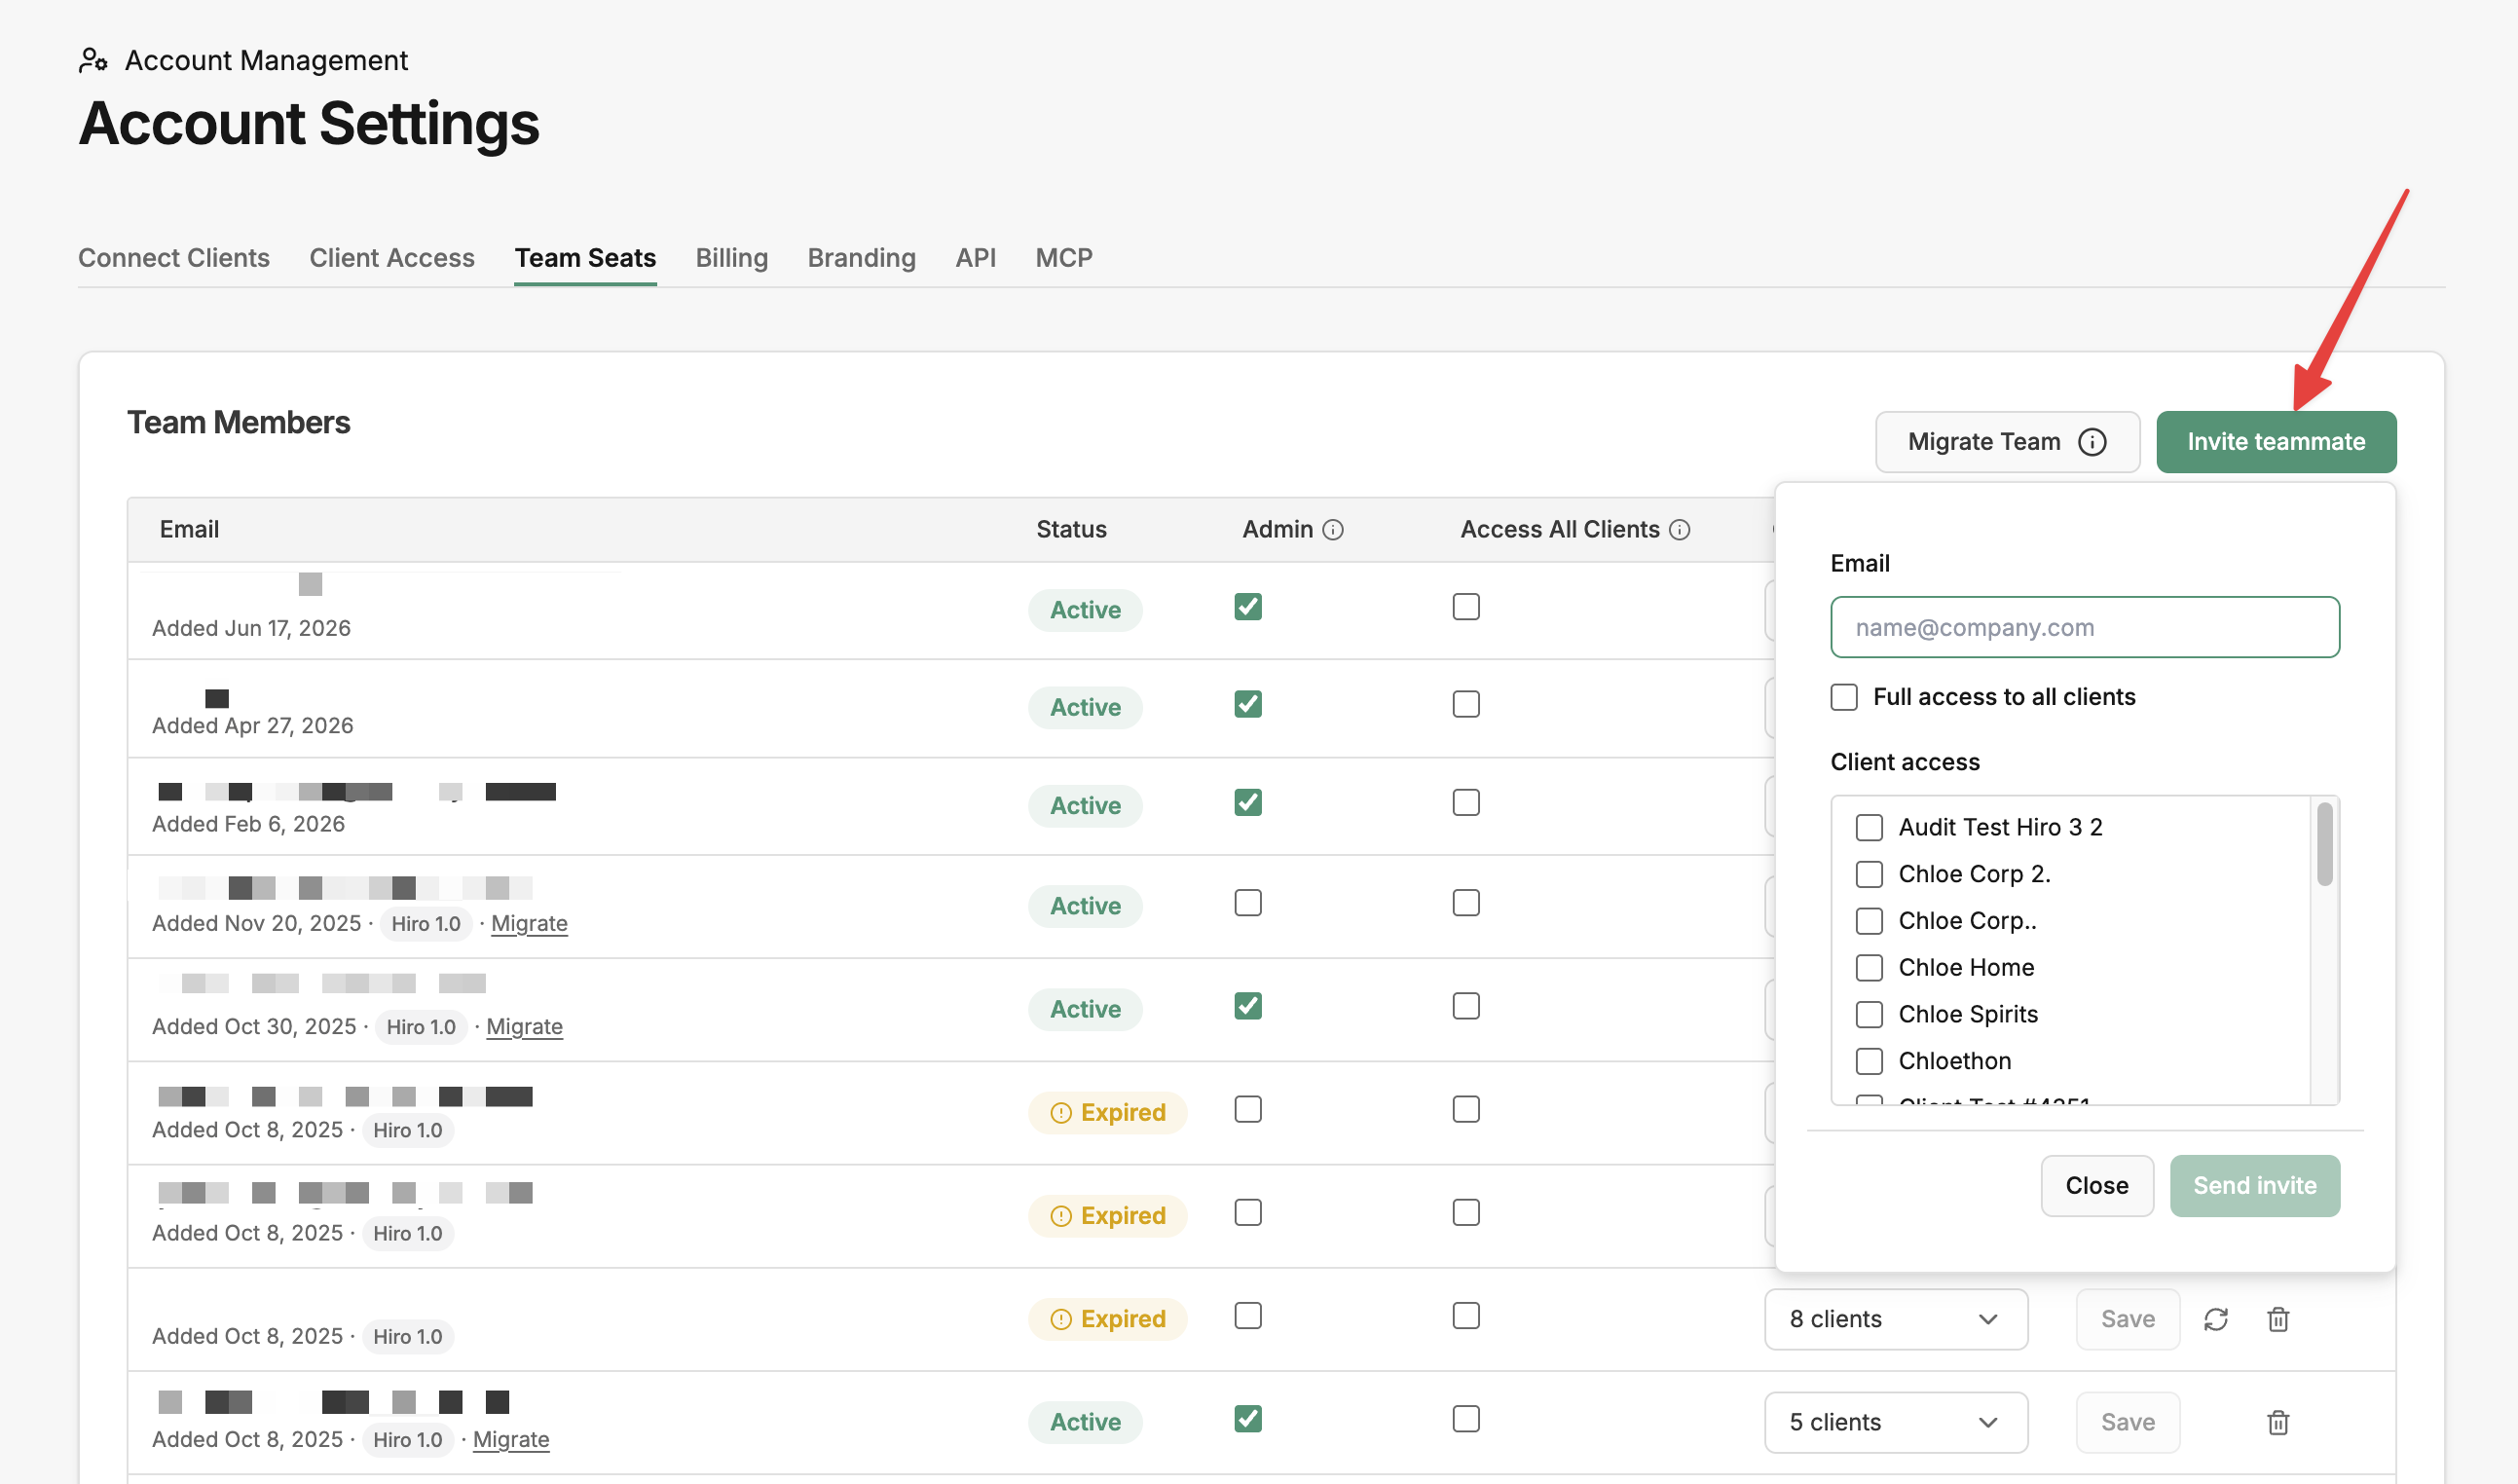
1.2 Add Your Team
Use the Team Seats tab to invite team members and control access levels. You can grant team-wide access or restrict team members to specific clients. Learn how to Manage Team Users
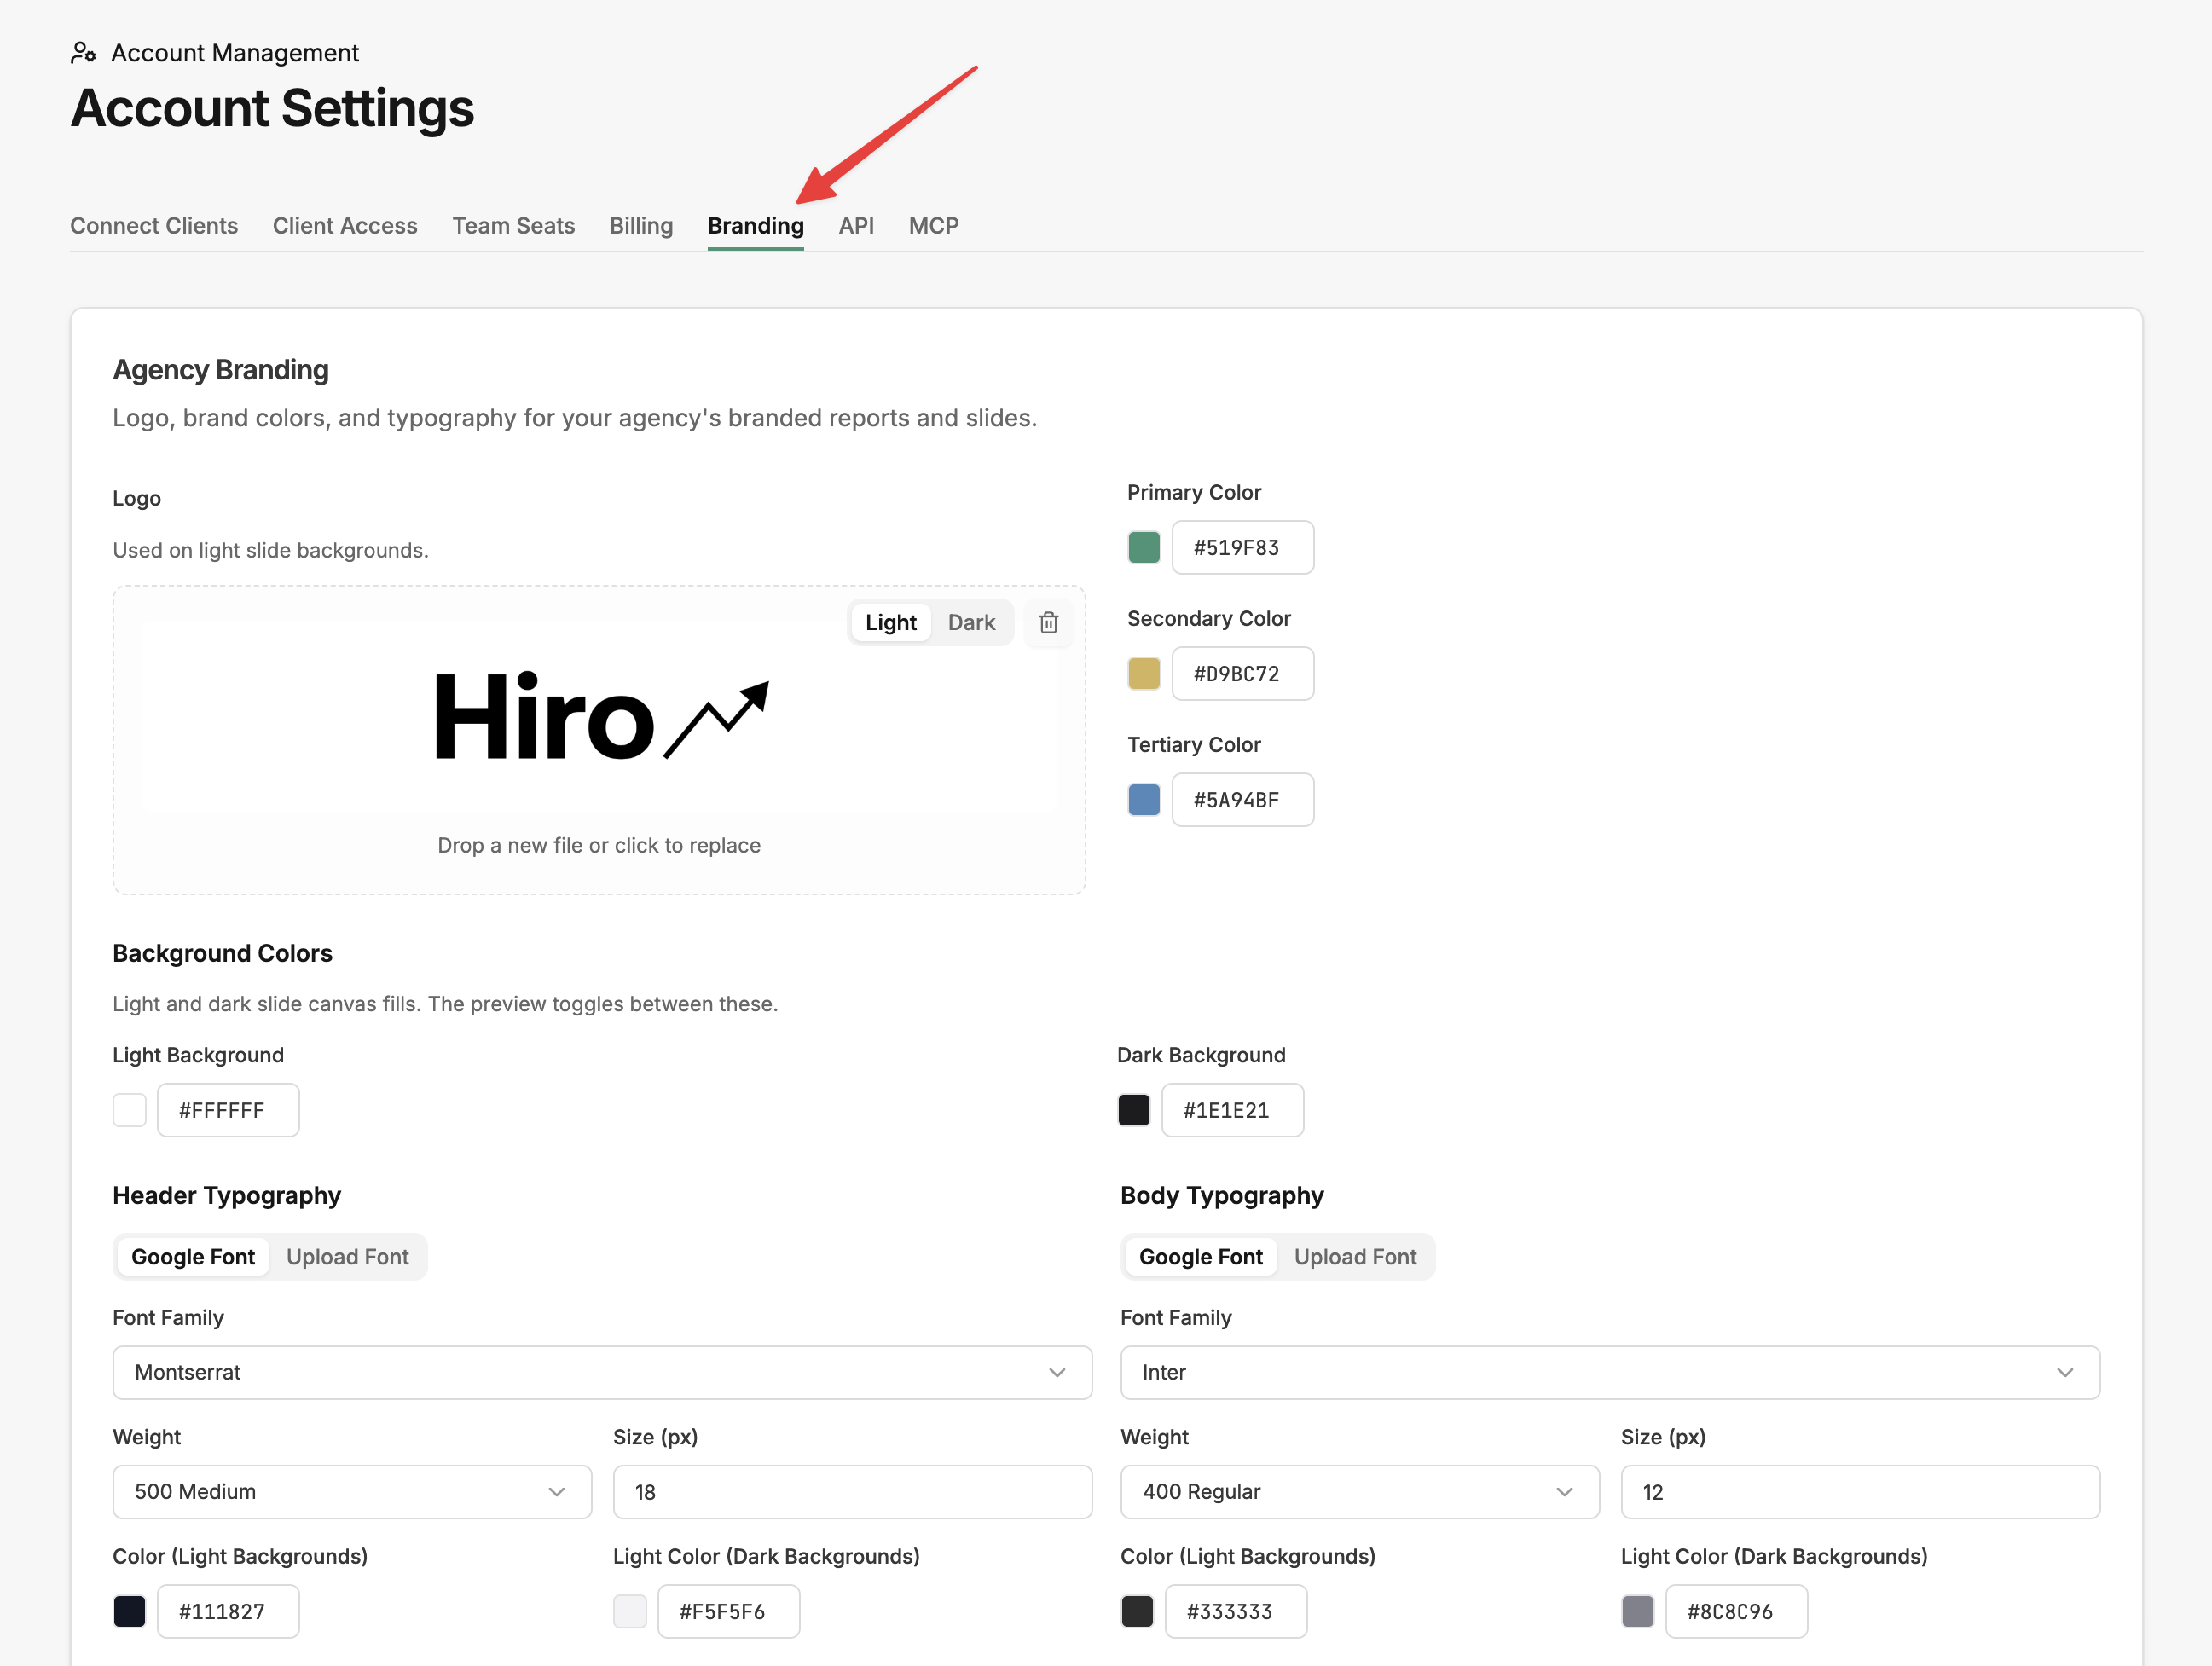
1.3 Apply Agency Branding
Use the Branding tab to customize dashboards and reports with your agency logo and colors for a polished, on-brand experience across all clients.
1.4 Connect AI with the Hiro MCP 2.0
Use the MCP tab to get your new 2.0 MCP URL. Access your client data, get AI-assisted insights, and automate your reporting workflow end to end. Swap the new URL in wherever you use the Hiro API or MCP (Claude, ChatGPT, Cursor, etc.). Learn more →
Heads up: The 2.0 MCP uses a different URL than 1.0. If you're still pointed at the 1.0 URL, update it from Account Settings to get the latest data and features.
1.5 API Access (Optional)
Use the API tab if you need programmatic access to Hiro data outside of the MCP. View Docs →
Phase 2: Client Settings Setup
Once your agency account is configured, set up each client individually. These settings control data accuracy, integrations, and per-client branding.
Where to find it: Select a client from the client switcher → Client Settings
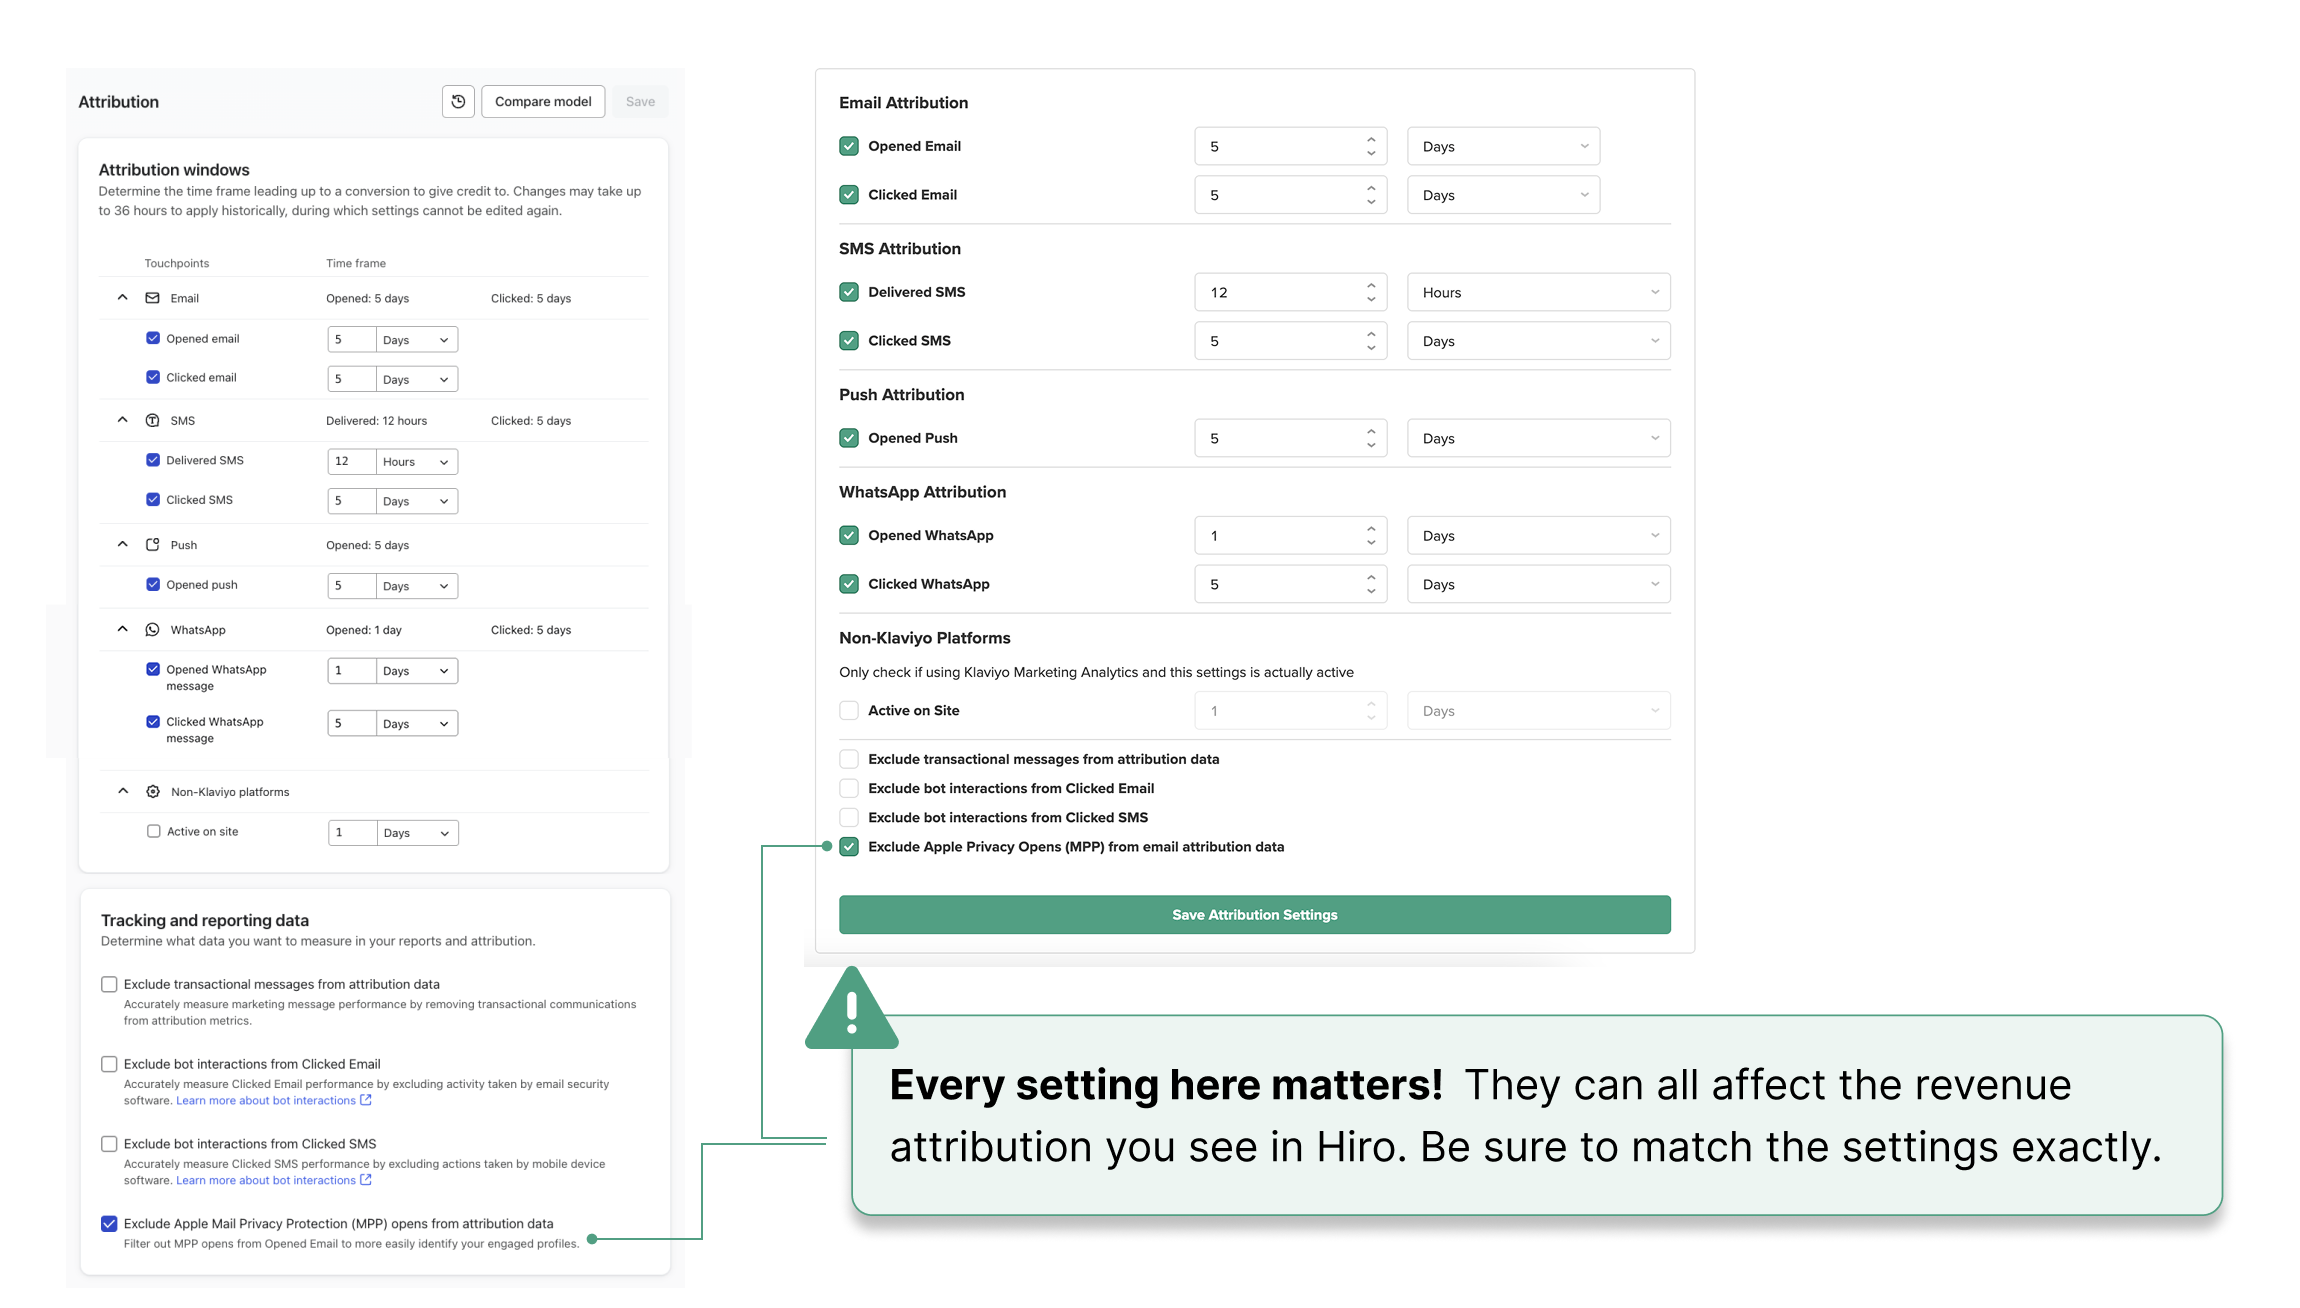
2.1 Align Attribution Settings
Match your Hiro attribution windows with your Klaviyo settings for reporting accuracy. This ensures Hiro's attributed revenue lines up with how Klaviyo credits messages for conversions.
2.2 Filter Out Unwanted Orders
Filter out recurring subscription revenue, draft orders, and POS orders from your attribution data so your numbers reflect only the purchases marketing actually drove. Learn more →
2.3 Set Up Tracked Metrics
Track advanced metrics like Subscriptions Started or Reviews Submitted for deeper retention insights beyond revenue. These will show up across campaigns and flows so you can see how email/SMS contributes to key business actions. Learn more →
2.4 Set Up Tracked Segments (Optional)
Sync specific Klaviyo segments to analyze campaign performance by audience and track long-term segment value over time. Learn more →
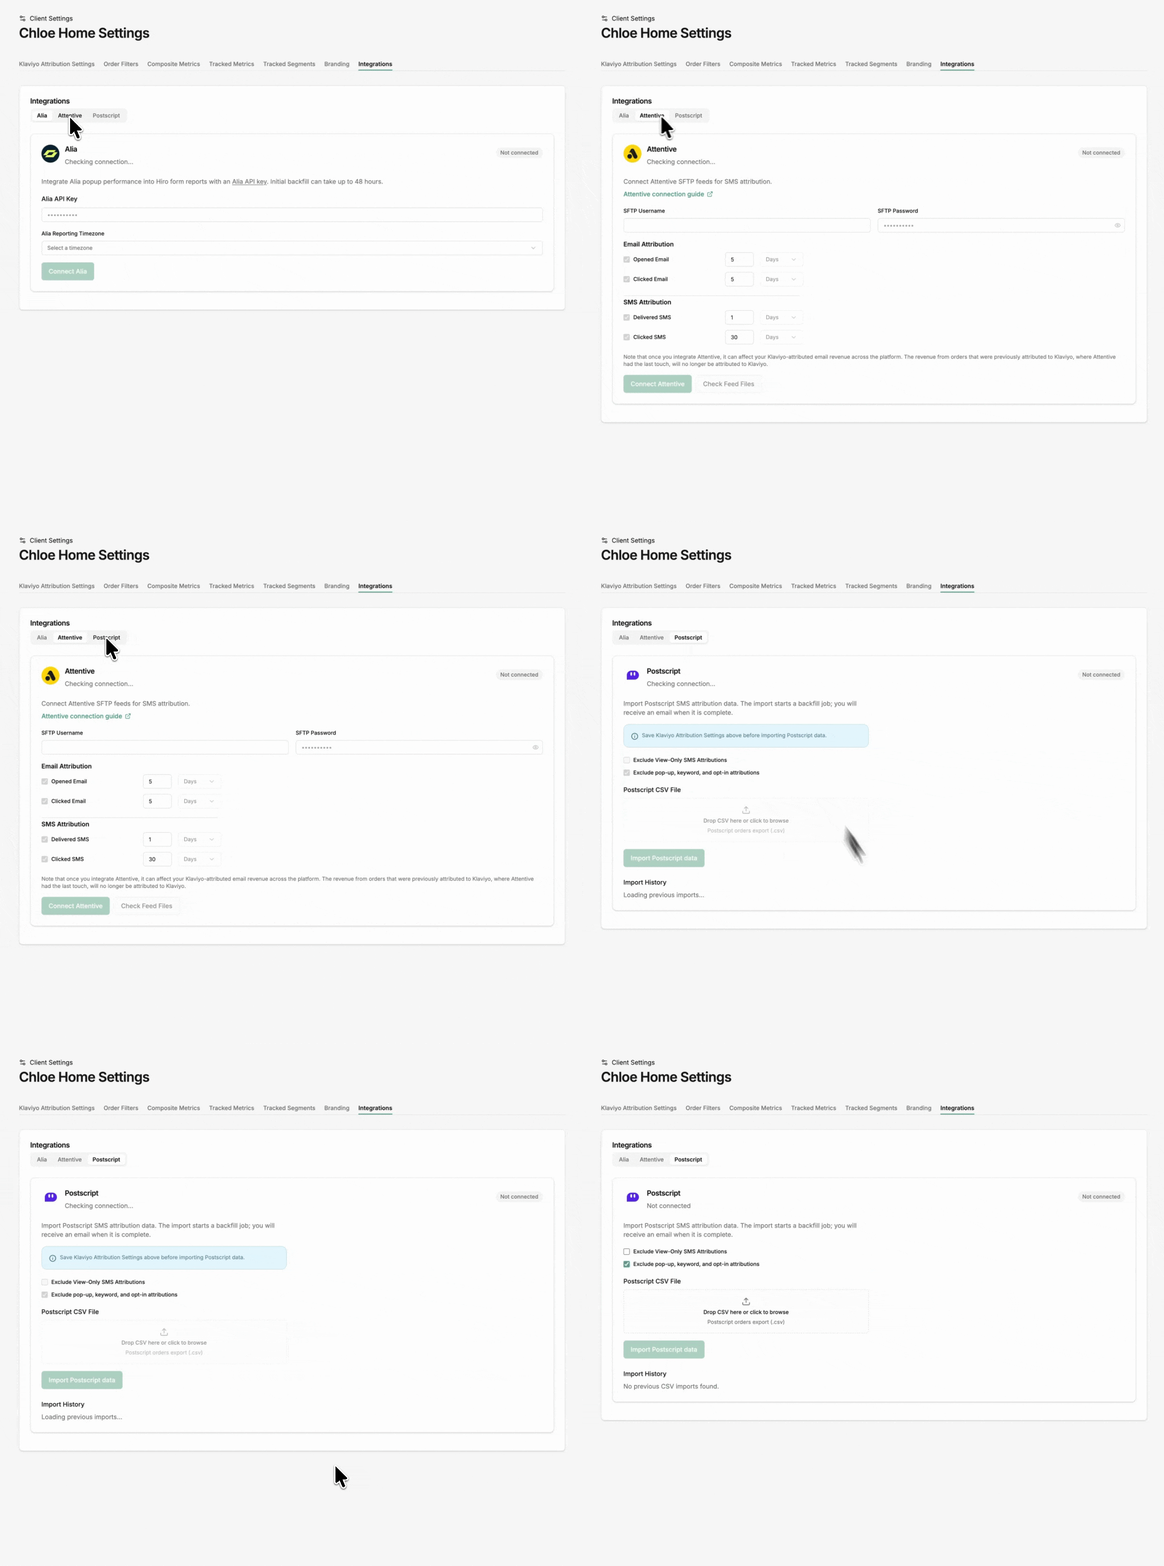
2.5 Connect Additional Email/SMS Platforms
Use the Integrations tab to connect platforms like Alia, Attentive, or Postscript so everything lives in one dashboard alongside your Klaviyo data.
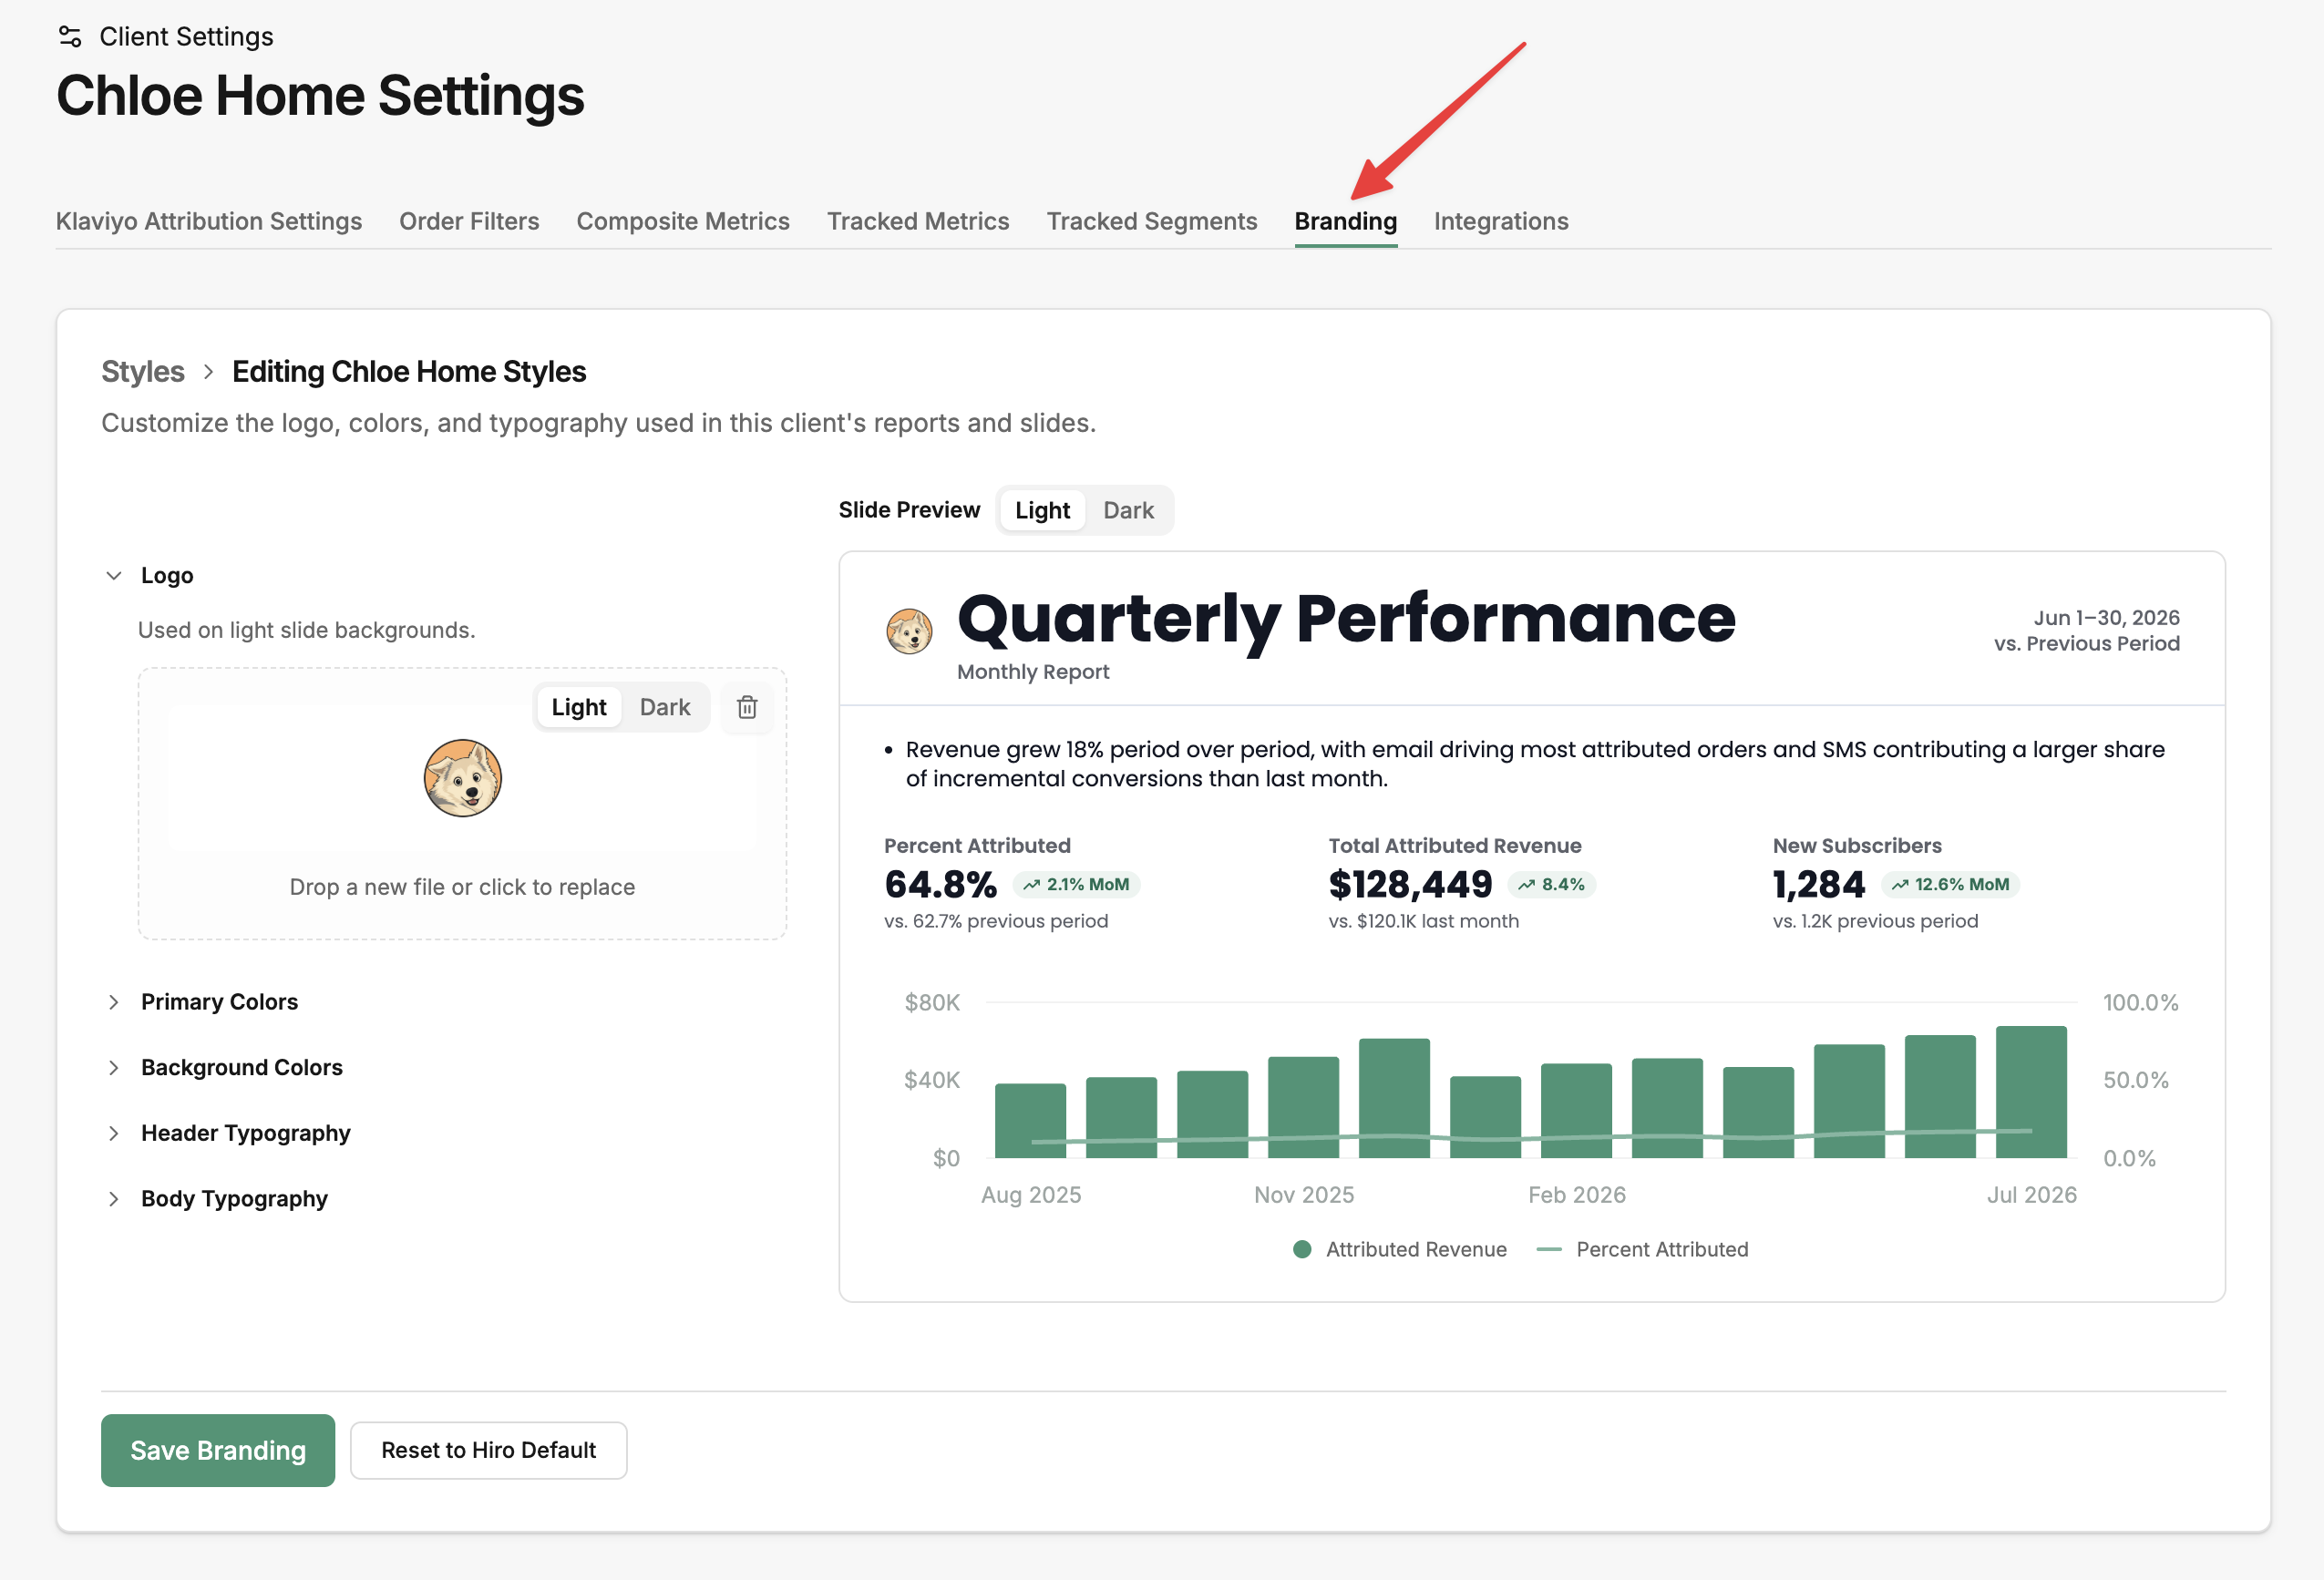
2.6 Apply Client Branding
Use the Branding tab to customize the client's dashboard and reports with their own logo and colors, separate from your agency branding.
Phase 3: Reporting & Automations
Now that data and integrations are flowing, set up your reporting and automation tools so insights reach your team and clients consistently.
3.1 Report Generator
Save time with a pre-built template or design your own slides for personalized, client-ready report using the Report Generator. Automate daily, weekly, or monthly performance summaries straight to your inbox. Learn more →
3.2 Custom Dashboard
Give clients self-serve access to customizable dashboards. The standard Custom Dashboard has been upgraded to a new multi-tab 2.0 version so clients can navigate between views without leaving the page. Learn more →
3.3 Set Up Slack Notifications
Send performance updates to internal or client-facing Slack channels so your team and clients stay in the loop without logging in. Learn more →
Phase 4: Explore Hiro Dashboards
With everything set up, use Hiro's dashboards to go from high-level snapshots to deep-dive analytics and uncover opportunities for optimization.
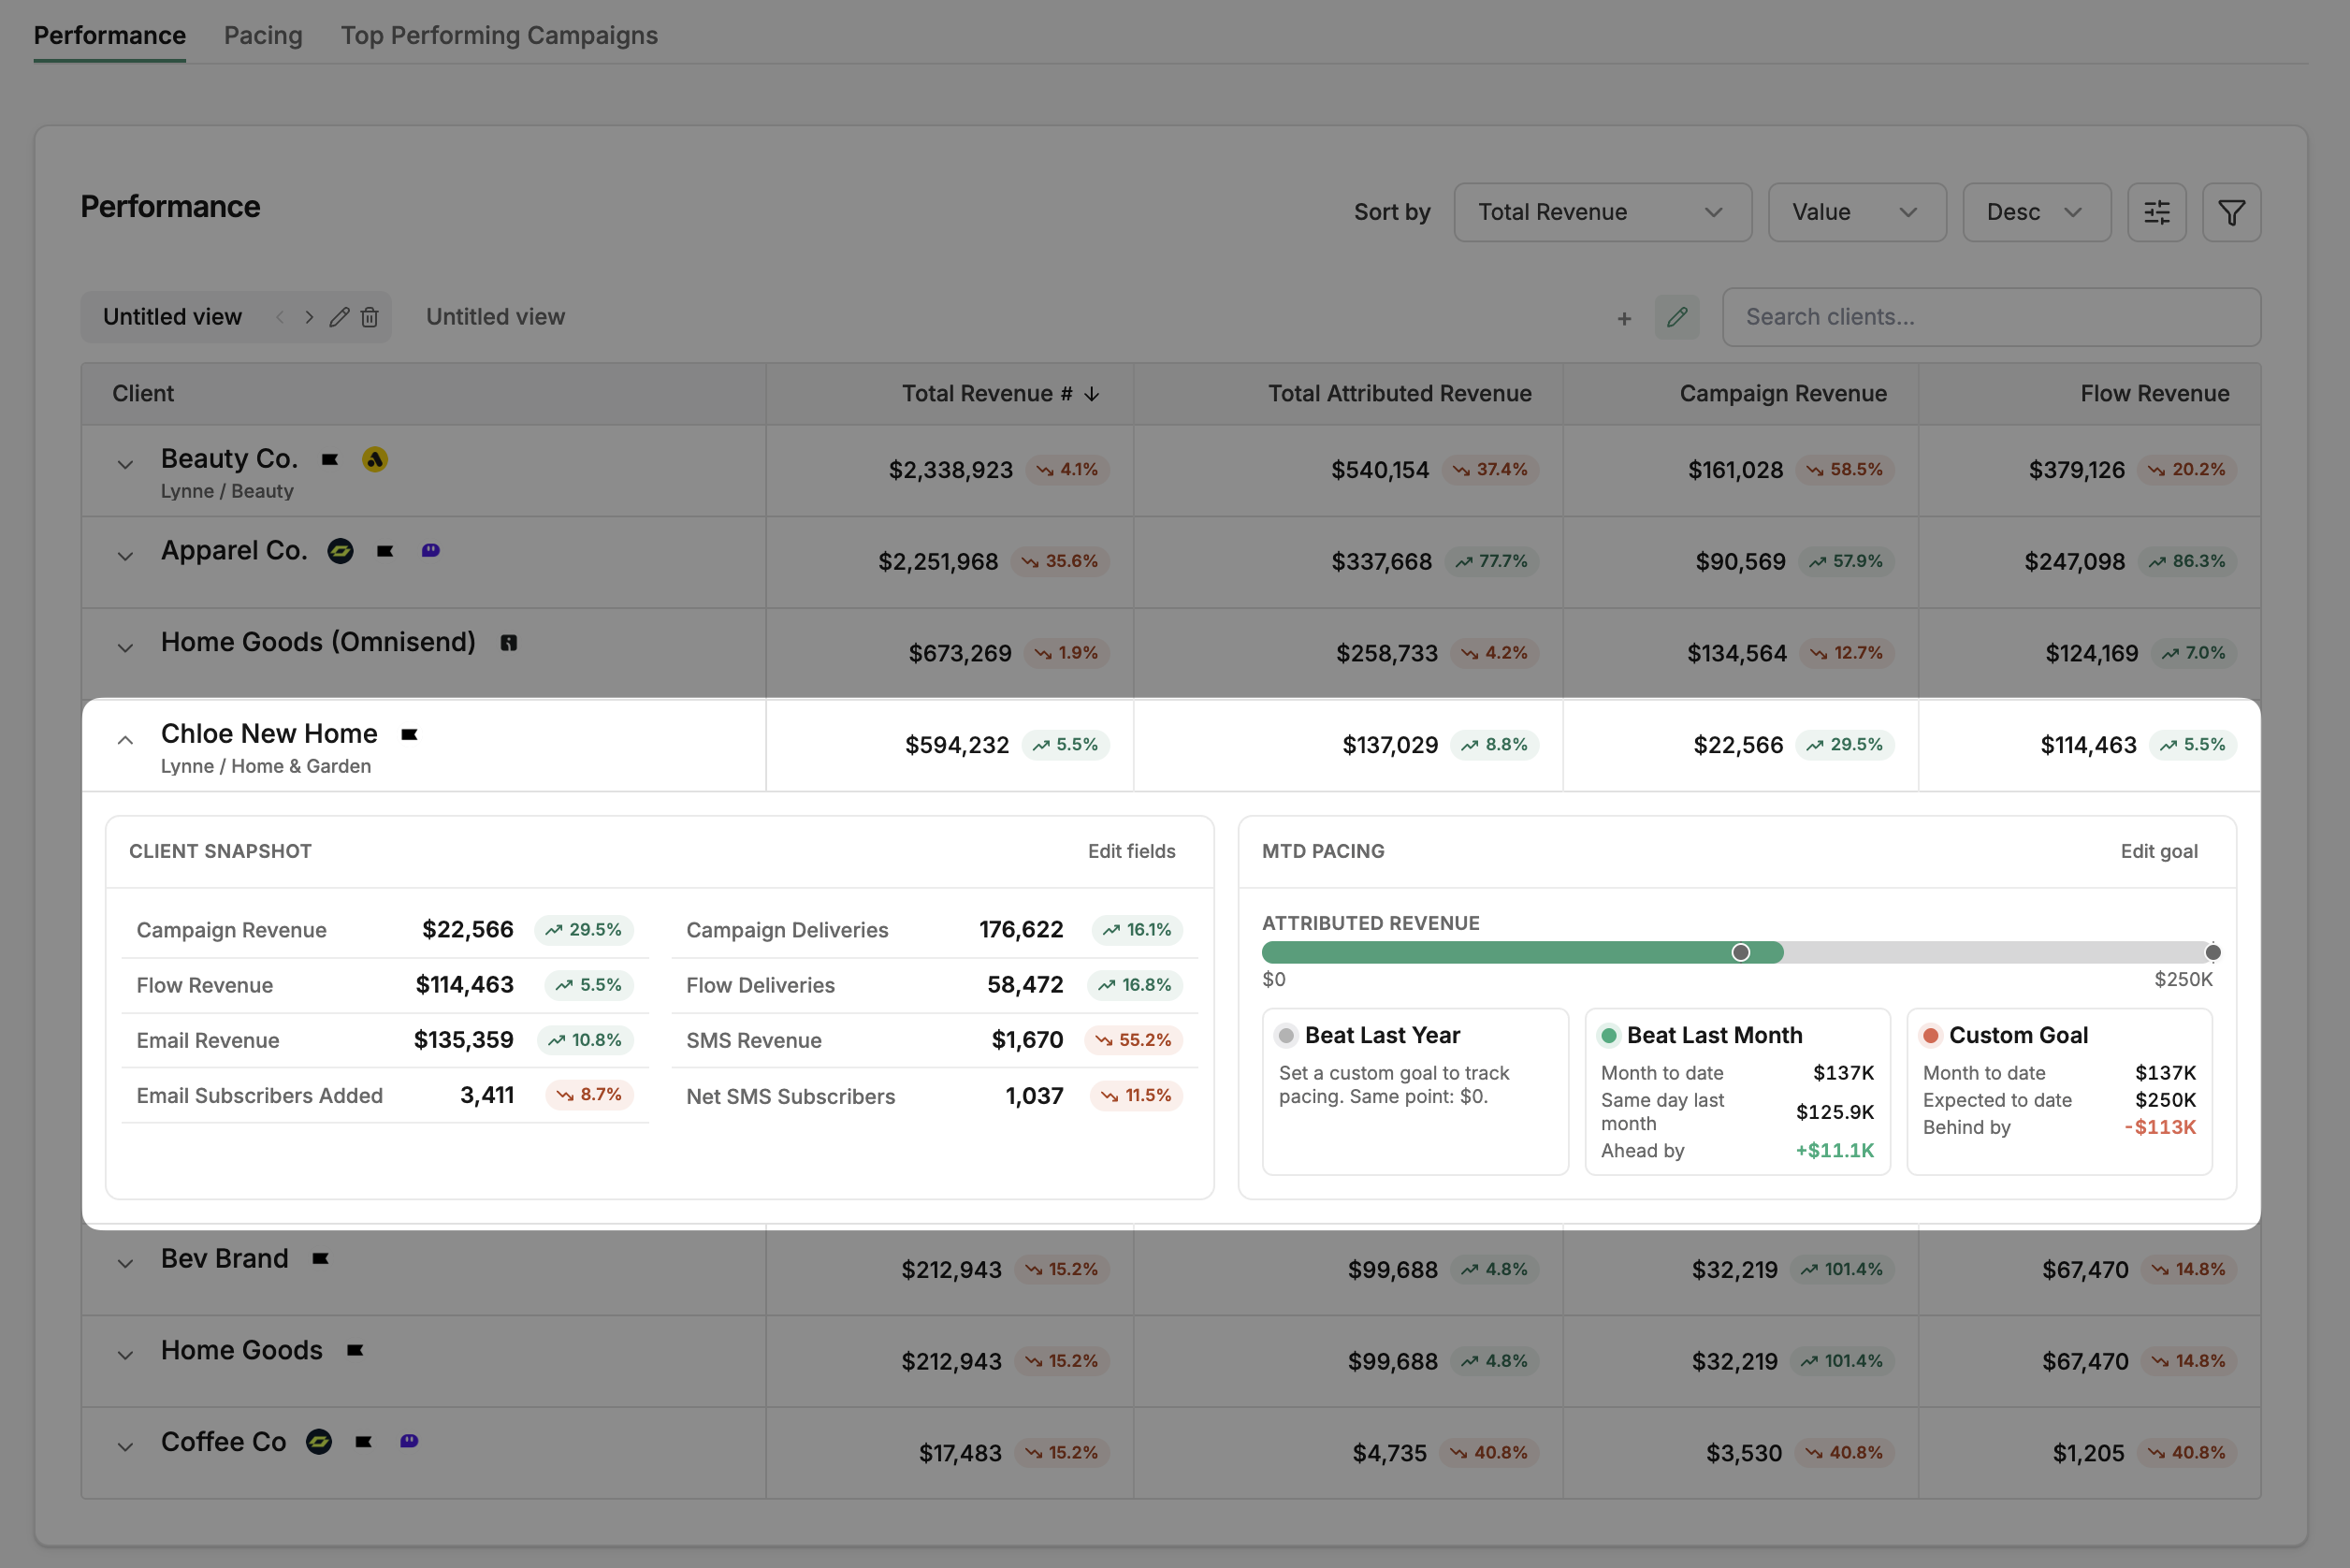
Agency Performance Dashboard
Assign account managers, select KPIs, and filter views for a quick performance summary across all accounts.
Campaign Analytics
The Campaigns tab covers everything from high-level performance trends to creative-level analysis. Start with the Overview for a quick snapshot, then drill into the Deep Dive and specialized views to optimize individual sends.
Campaign Deep Dive
Compare individual campaign performance period-over-period to refine your strategy. Filter by tags, channels, or date ranges to focus on specific sends.
Campaign Creative View
View the actual creative designs of your campaigns side by side with their performance metrics, so you can identify high-performing design trends, content styles to double down on what's working.
Campaign Tag Analysis
Analyze performance grouped by campaign tag or category to see which types of campaigns (e.g. promotional, newsletter, product launch) drive the most revenue and engagement. Useful for high-level strategy and planning.
Subject Lines
Compare subject line performance across campaigns to see which messaging resonates best with your audience. Identify patterns in language, length, and framing that drive higher open rates.
Campaign Message Timing
Identify the best times to send emails or SMS for maximum engagement. See performance by send day and time to optimize your sending schedule.
Flow Analytics
The Flows tab covers the full lifecycle messaging program — from high-level flow performance to message-level breakdowns, creative analysis, and visual flow mapping. Start with the Overview for a snapshot, then drill into the Deep Dive for message-level optimization.
Flow Overview
A top-line snapshot of flow performance — revenue, engagement trends, and period-over-period comparisons across all flows. Use this to quickly assess how your automated messaging is performing before drilling into individual flows.
Flow Deep Dive
Evaluate flows at the message level — see how each individual message within a flow is performing, tag messages for performance comparisons, and reorder messages to prioritize what matters most for your reporting. Learn more →
Flow Comparison
Compare two or more flows side by side across key metrics to see which flows are outperforming others. Useful for evaluating similar flows (e.g. welcome series variants) or benchmarking flows against each other.
Flow Creatives
View the actual creative designs of your flow messages alongside their performance metrics, so you can identify which visual and content styles are driving engagement and conversions across your flows.
Flow Maps
See every flow in your account on an interactive visual map for a quick overview of your entire lifecycle messaging program — how flows connect, what triggers them, and where customers move through the journey. Learn more →
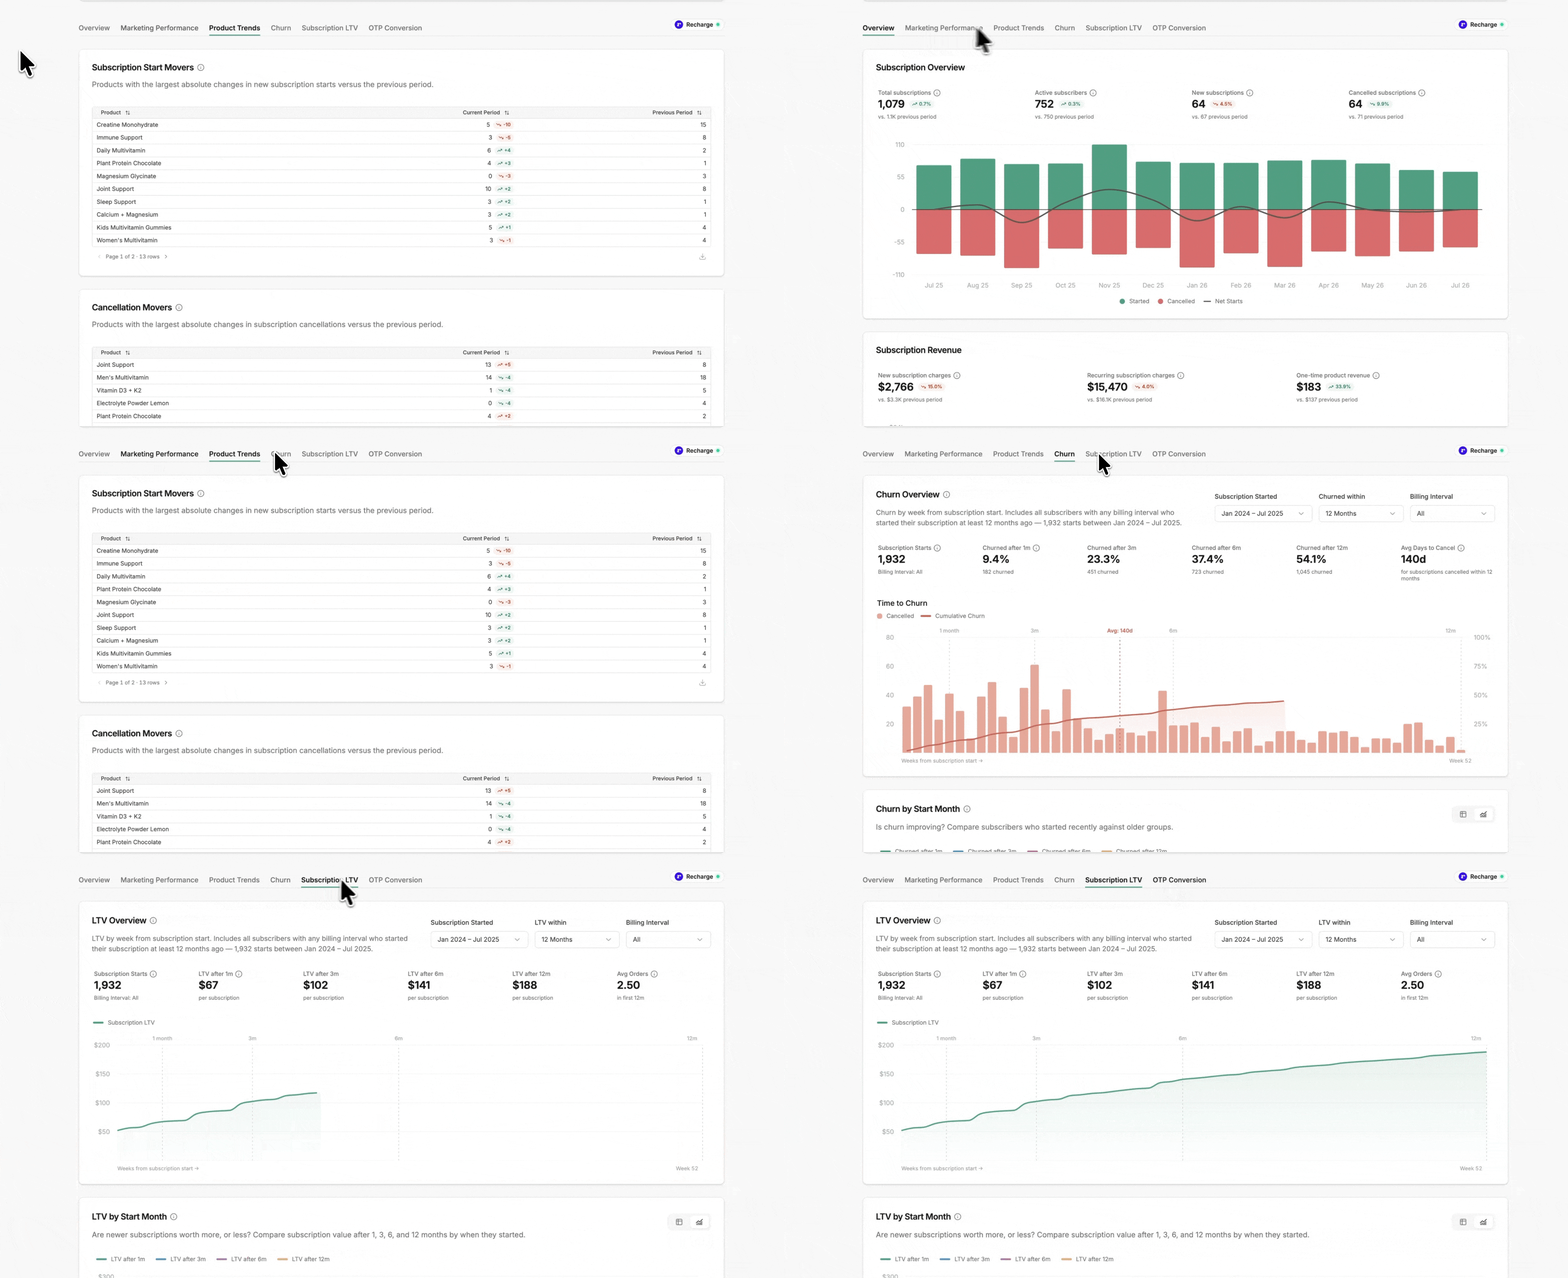
Subscription Suite
A full subscription analytics suite — track subscriber growth, churn, winbacks, and subscription revenue in one place. If your clients run a subscription program on Recharge, Loop, Skio, Stay AI, or Seal, this will populate automatically without having to track additional metrics.
Cohort Analytics
The Cohorts tab brings together Hiro's retention and lifetime-value tools. Each one looks at a different stage of the customer journey — from the first purchase all the way through to long-term LTV — so you can understand not just what revenue came in, but what's driving customers to come back.Support & Next Steps
Subscriber to First Purchase
See how new subscribers convert into first-time buyers — which offers and signup forms are driving conversions, how quickly after signup they purchase, and what products they're buying. Includes an attribution breakdown so you can tie first purchases back to the campaigns and flows that triggered them.
First to Second Purchase
Measures the rate at which first-time buyers come back for a second purchase, grouped by first purchase month so you can see whether your one-time-to-repeat conversion is improving over time. Useful for evaluating post-purchase flows and welcome series effectiveness.
Retention by Product
Shows which products drive repeat purchases and loyalty. Compare repurchase rates across products to identify your best retention drivers — the items that turn one-time buyers into returning customers.
Product Paths
Visualizes the journey customers take through your product catalog as a Sankey-style flow diagram. See what products lead to what, which combinations drive the most repeat purchases, and filter by keywords or product group to focus on specific paths to help guide cross-sells.
LTV
Tracks lifetime value at key milestones (1 month, 3 months, 6 months, 12 months) so you can see how much revenue a customer generates over time. Break it down by product to understand which items deliver the highest long-term value, not just the highest first-order value.
Support & Next Steps
Enablement Sessions
Schedule a session with our team to answer client-specific questions and explore advanced features tailored to your use cases. Find a time →
Email Assistance
Contact us at help@hiroanalytics.com and we'll get back to you as soon as we can!
Slack Support
Reach out anytime in your shared Slack channel for real-time help from the team.
Hiro 1.0 → Hiro 2.0 Beta Quick Checklist
For agencies coming over from Hiro 1.0, here's your one-time move checklist:
Bookmark your new Hiro 2.0 home: app.hiroanalytics.com/rr/app/page/home
Upgrade existing client users to 2.0 under Account Settings → Client Access
Swap your Hiro API / MCP URL to the new 2.0 version from Account Settings
Confirm your Report Generator and Custom Dashboard templates carried over (they should — no rebuild needed)